I decided it would be fun to participate in a
craft-along, hosted by my friend
Cheri. The project is an apron, and I decided to do a
vintage style apron with a ruffle along the bottom. Super cute, but I don't know how to sew a ruffle. Thankfully my mother-in-law, Jan, was visiting this past week for Ethan's surgery and she is an amazing seamstress (her specialty is hand made quilts, but she can sew just about anything!). She gave me a lesson on how to make a ruffle. Here's how:

Fold and press your ruffle fabric in half (wrong sides together) and make a running stitch 1/4 inch from the raw edge. This was a stitch length setting of 3 for me on my machine. You want it to be loose enough so you can pull to get the ruffle. The directions for this apron only called for one running stitch line, but Jan told me that a true ruffle should be made with two running stitch lines, to give a more finished even look. So after you make your first running stitch, do another one, using 1/4 inch seam allowance again. Make sure you leave a few inches of thread as trail on either end for both lines.


Here is what it should look like. Don't worry about being able to see these stitches because you are going to rip them out later once your ruffle is sewn to your main piece.

Find your bottom thread and carefully tug, using your hands to pull the fabric towards the center, to create the ruffle.

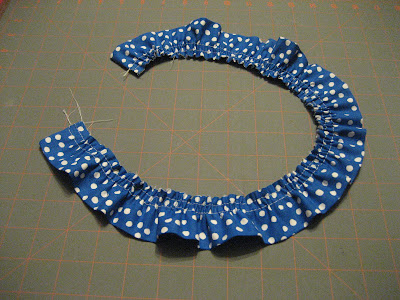
Use a pin to secure one end, and then work from the opposite end to continue making the gathers till you get to your desired length. Make it look as even as possible. Tie a knot with the threads at either end and cut off the excess thread.

Now your ruffle is complete! Doesn't it look nice?
More to follow on the craft-along....stay tuned.
 I decided it would be fun to participate in a craft-along, hosted by my friend Cheri. The project is an apron, and I decided to do a vintage style apron with a ruffle along the bottom. Super cute, but I don't know how to sew a ruffle. Thankfully my mother-in-law, Jan, was visiting this past week for Ethan's surgery and she is an amazing seamstress (her specialty is hand made quilts, but she can sew just about anything!). She gave me a lesson on how to make a ruffle. Here's how:
 Fold and press your ruffle fabric in half (wrong sides together) and make a running stitch 1/4 inch from the raw edge. This was a stitch length setting of 3 for me on my machine. You want it to be loose enough so you can pull to get the ruffle. The directions for this apron only called for one running stitch line, but Jan told me that a true ruffle should be made with two running stitch lines, to give a more finished even look. So after you make your first running stitch, do another one, using 1/4 inch seam allowance again. Make sure you leave a few inches of thread as trail on either end for both lines.
 Here is what it should look like. Don't worry about being able to see these stitches because you are going to rip them out later once your ruffle is sewn to your main piece.
 Find your bottom thread and carefully tug, using your hands to pull the fabric towards the center, to create the ruffle.


looks good!
ReplyDelete